Difficulty |
1 |
1. Scenes
The purpose of a ray tracer is to render scenes. A scene consists of three parts:
-
A scene is made out of possibly many (millions, billions) geometric shapes, which we will also call primitives. In games, these shapes all tend to be triangles, since these are the only shapes GPUs can render. Our ray tracer, however, can also support other primitives, such as spheres, planes, cylinders, cones, etc.
-
A ray tracer traces rays (don’t act surprised.) These rays can be seen as light rays. In order to have light rays, we need light sources. So, for anything to be visible in a scene, we need light sources to illuminate the primitives.
-
A scene also needs to mention where the "eye" is positioned. We will call this the scene’s camera.
All these elements must be represented somehow. Since the ray tracer is written in C++ using the OO paradigm, it makes sense to represent these entities (shapes, light sources, camera, …) as objects. And that is indeed how our ray tracer works internally.
So, in order to render a scene, we can write C++ code that instantiates shapes and light sources and a camera and give these to some ray tracer object.
While this is certainly possible, it is not practical.
Compare it to a browser: in order to view a page, you don’t download Chrome’s source code and programmatically create paragraph, header and images objects.
Instead, a browser can be "scripted": it receives all its data in separate files, such as an .html, .css or .js files.
From these, the browser is able to create the necessary objects internally and render and interact with them.
The ray tracer works the same way: the scene will be described in a separate file written in a language called ChaiScript. The ray tracer will parse this file and instantiate the appropriate objects based on its contents. This approach has the following advantages:
-
You can define scenes in a language that is much simpler than C++.
-
You don’t need to recompile when you make changes to a scene.
2. A Single Sphere
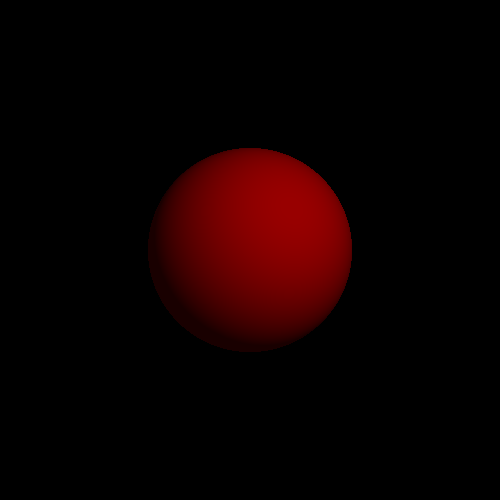
This is a rendering of a scene consisting of the following elements:
-
There’s a red sphere.
-
A light source shines on this red sphere.
-
The camera looks straight at the sphere.
This scene can be written in ChaiScript as
var camera = Cameras.perspective( [ "eye": pos(0,0,5),
                                    "look_at": pos(0,0,0) ] )


var material = Materials.uniform( [ "ambient": Colors.red() * 0.1,
                                    "diffuse": Colors.red() * 0.5 ] )

var root = decorate(material, sphere())

var lights = [ Lights.omnidirectional( pos(2,2,5), Colors.white() ) ]

var scene = create_scene(camera, root, lights)

var raytracer = Raytracers.latest()

var renderer = Renderers.standard( [ "width": 500,
                                     "height": 500,
                                     "sampler": Samplers.single(),
                                     "ray_tracer": raytracer ] )

pipeline( scene,
          [ Pipeline.renderer(renderer),
            Pipeline.wif(),
            Pipeline.base64(),
Pipeline.stdout() ] )|
Note
|
Note how the script does define other things besides just the scene:
|
|
Take some time to find out how the main elements (primitives, camera, light sources) are written in this script. |
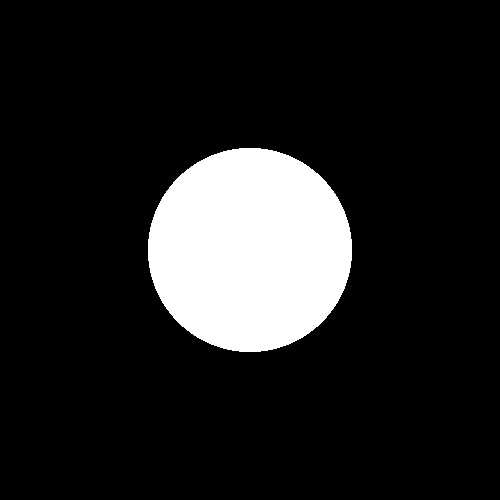
If you were to feed this script to the ray tracer, it should output the image above. There’s a small catch though: the ray tracer code you received is quite incomplete and, if given the script above, will produce a slightly different result:
|
Have your ray tracer render the script above and check that it indeed produces the image shown above. |
Right now, your ray tracer works in a very minimalistic way: for each pixel, it simply checks if there’s a primitive in that direction and colors it white if so, and black if not. It does not care about the sphere’s colors or light sources.
Because of this minimalism, some parts of the scene will straight out be ignored by your ray tracer. For example, in its current state, since the ray tracer doesn’t take into account light sources, so we might as well leave them out:
var camera = Cameras.perspective( [ "eye": pos(0,0,5),
                                    "look_at": pos(0,0,0) ] )

var root = sphere()

var lights = [ ]

var scene = create_scene(camera, root, lights)

var raytracer = Raytracers.latest()

var renderer = Renderers.standard( [ "width": 500,
                                     "height": 500,
                                     "sampler": Samplers.single(),
                                     "ray_tracer": raytracer ] )

pipeline( scene,
          [ Pipeline.renderer(renderer),
            Pipeline.wif(),
            Pipeline.base64(),
Pipeline.stdout() ] )|
Render this simplified version and check that the removal of certain parts of the script does indeed not affect the end result. |
3. The Camera
It is important that you understand the basic elements of a scene as well as how to specify them in ChaiScript. Let’s focus on the camera. It is defined as
var camera = Cameras.perspective( [ "eye": pos(0,0,5),
                                    "look_at": pos(0,0,0) ] )
This little piece of code expresses the following:
-
We are using specific type of camera, namely the perspective camera. Other cameras are the depth of field camera and fisheye camera, but these are not implemented yet.
-
The camera is positioned at \((0, 0, 5)\).
-
The camera is oriented towards \((0, 0, 0)\). This coincides with the sphere’s position, which explains why the sphere is centered in the final rendering.
We give you a few simple tasks to familiarize yourself with the coordinate system.
|
Change the camera’s position so that the camera is farther away from the sphere. This should result in a smaller circle in the end result. 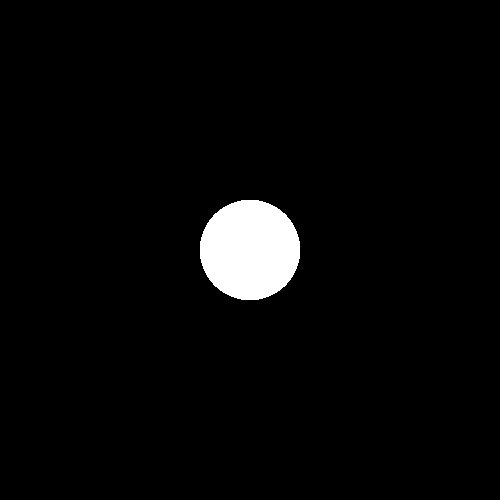
|
|
Change the camera’s position so that the camera is closer to the sphere. 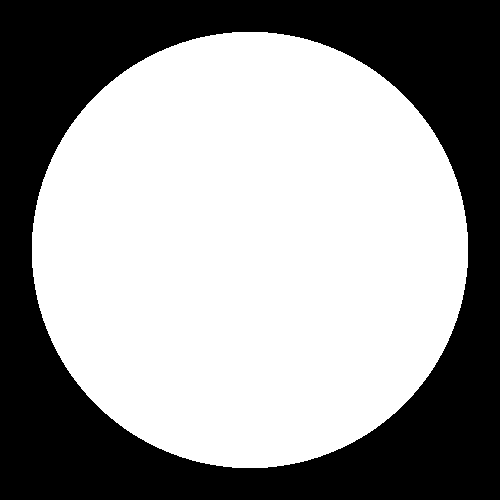
|
|
Move the camera back to where it was. Have it look at the top of the sphere, knowing that the sphere has radius 1. 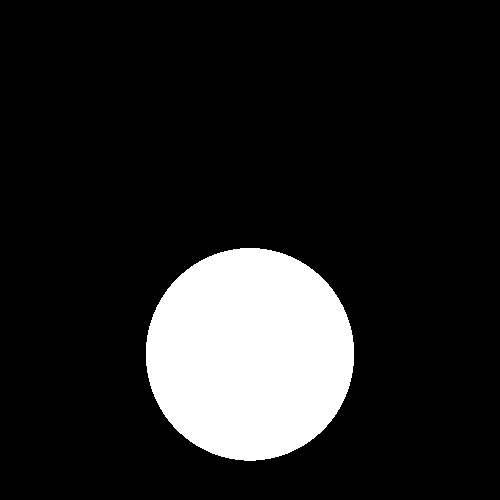
|
4. Two Spheres
Our scene contains a single sphere:
var camera = Cameras.perspective( [ "eye": pos(0,0,5),
                                    "look_at": pos(0,0,0) ] )

var root = sphere()

var lights = [ ]

var scene = create_scene(camera, root, lights)
Let’s say we want a second sphere.
There’s a slight problem, though: the create_scene function accepts only a single primitive.
However, this does not have to mean we’re restricted to scenes containing just a single shape: if we want more than one shape, we can group them together in a union.
A union effectively turns 2 or more primitives in a single one.
var camera = Cameras.perspective( [ "eye": pos(0,0,5),
                                    "look_at": pos(0,0,0) ] )

var root = union([ sphere(), sphere() ])

var lights = [ ]

var scene = create_scene(camera, root, lights)
If we were to render this, we’d get

This looks suspiciously similar to our previous result. The problem is that we created two spheres, but they are located at exactly the same location. We therefore have two perfectly overlapping spheres. We should try to move at least one of the spheres.
var root = union([
    sphere(),
    translate(vec(1,0,0), sphere())
])
This looks promising.
translate(vec(1, 0, 0), primitive) moves primitive a distance (1, 0, 0), which means "one unit to the right" in our case.
However, the spheres still partially overlap.
|
Adapt the script so that the two spheres touch each other: 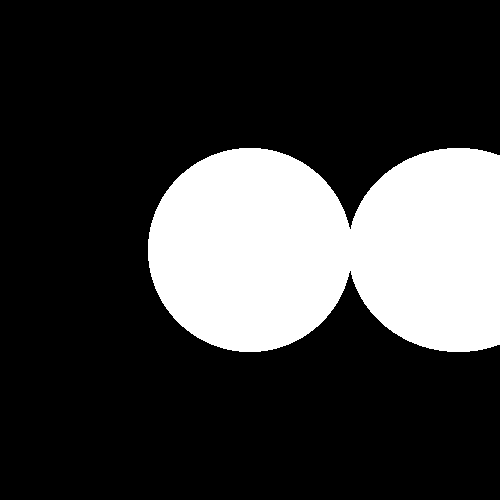
|
|
Add an extra sphere: 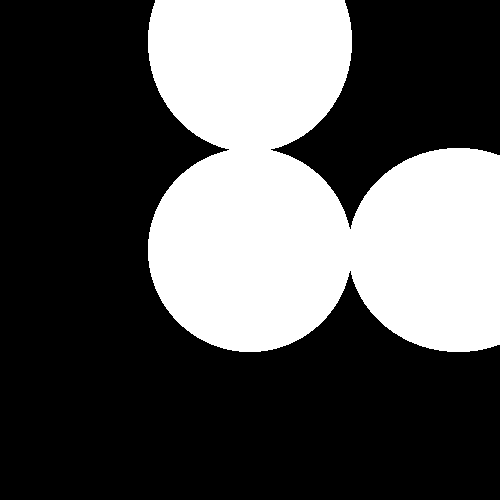
|
|
Let’s add even more. 
Since it might not be clear what is happening here, here’s a better rendering. Don’t forget you can move the camera. 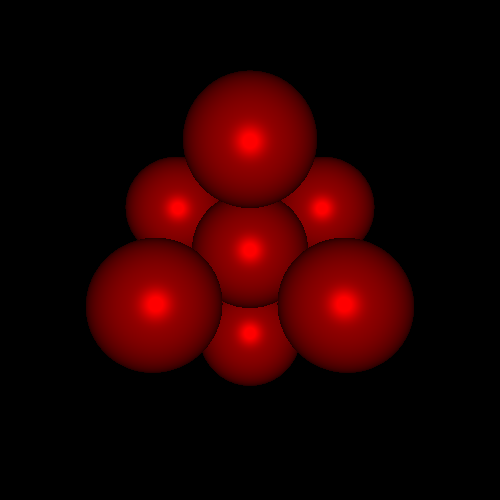
|
5. Animations
Up until now, we’ve been rendering single images. Let’s see how we can make animations instead.
5.1. Scene Function
The idea behind animations is very simple: it’s merely a sequence of images shown quickly one after the other. For each such image we have to define a separate scene. These scenes will be very similar: things will probably only have moved a tiny bit from one scene to the next.
The easiest way to create a series of scenes is to define a function:
def scene_at(now)
{
  var camera = ...

  var root = ...

  var lights = ...

  // writing "return" is optional
  create_scene(camera, root, lights)
}
The parameter now represents the time.
Let’s for now pretend it is a double.
Say you want an animation lasting 10 seconds that runs at 50 frames per second.
The function should then be called with now equal to 0.0, 0.02, 0.04, 0.06, etc.
def scene_at(now)
{
  var camera = ...

  var root = translate(vec(now, 0, 0), sphere())

  var lights = ...

  // writing "return" is optional
  create_scene(camera, root, lights)
}
This describes an animation where the sphere moves to the right.
5.2. Animate
Now, this won’t actually work: now is not a double, but a TimeStamp, meaning we can’t directly use now as a coordinate.
Fortunately, it’s not too hard to make it work:
def scene_at(now)
{
  var camera = ...

  var x = Animations.animate(0, 10, seconds(5))
  var root = translate(vec(x[now], 0, 0), sphere())

  var lights = ...

  create_scene(camera, root, lights)
}
Here, Animations.animate(0, 5, seconds(10)) means "we wish to have an animated double x that goes from 0 to 5 in 10 seconds".
We can ask what x's current value is using x[now].
Assuming 50 fps, in the first frame of animation, x[now] will equal 0, for the second frame 0.02, etc.
5.3. Animation Pipeline
In order to produce an animation, we need to update the pipeline portion of the script. Previously, this was
pipeline( scene,
          [ Pipeline.renderer(renderer),
            Pipeline.wif(),
            Pipeline.base64(),
            Pipeline.stdout() ] )
To create an animation, we need to change this to
pipeline( scene_animation(scene_at, seconds(5)),
          [ Pipeline.animation(30),
            Pipeline.renderer(renderer),
Pipeline.studio() ] )-
scene_animationexpects the scene function as its first argument and the duration of the animation as its second. -
Pipeline.animation(30)specifies how many frames per second need to be rendered.
Since the animation lasts 5 seconds and the frame rate is set to 30, rendering this script will generate 5 × 30 = 150 images.
Here’s a complete script describing an animation.
def scene_at(now)
{
    var camera = Cameras.perspective( [ "eye": pos(0,0,5),
                                        "look_at": pos(0,0,0) ] )

    var x = Animations.animate(-5, 5, seconds(5))
    var root = translate(vec(x[now], 0, 0), sphere())

    var lights = [ ]

    create_scene(camera, root, lights)
}

var raytracer = Raytracers.latest()

var renderer = Renderers.standard( [ "width": 500,
                                     "height": 500,
                                     "sampler": Samplers.single(),
                                     "ray_tracer": raytracer ] )

pipeline( scene_animation(scene_at, seconds(5)),
          [ Pipeline.animation(30),
            Pipeline.renderer(renderer),
            Pipeline.wif(),
            Pipeline.base64(),
            Pipeline.stdout() ] )
Rendering this produces the following little movie:
|
Replicate the following animation: |
|
Replicate the following animation: |
|
Replicate the following animation: Note that you cannot (yet) scale primitives. |
|
Replicate the following animation: Note that you cannot (yet) scale primitives. |
|
Replicate the following animation: Don’t overcomplicate things: scripting-wise, achieving this is not more difficult than the previous tasks. |
6. What Comes Next
You’re now free to choose which extension to make next. Keep in mind that some extension build on others: these dependencies are listed at the top of the extension’s page.
7. Evaluation
There is no evaluation for this extension, meaning there is no need to save anything. No questions will be asked about this step during the defense.