Difficulty |
2 |
Prerequisites |
|
Reading material |
def scene_at(now)
{
  var camera = Cameras.perspective( [ "eye": pos(0,0,5),
                                      "look_at": pos(0,0,0) ] )

  var floor_material = Materials.uniform( [ "ambient": Colors.white() * 0.1,
                                            "diffuse": Colors.white() * 0.8,
                                            "reflectivity": 0.5 ] )

  var left_wall_material = Materials.uniform( [ "ambient": Colors.red() * 0.1,
                                                "diffuse": Colors.red() * 0.8 ] )

  var right_wall_material = Materials.uniform( [ "ambient": Colors.green() * 0.1,
                                                 "diffuse": Colors.green() * 0.8 ] )

  var back_wall_material = Materials.uniform( [ "ambient": Colors.blue() * 0.1,
                                                "diffuse": Colors.blue() * 0.8 ] )

  var ceiling_material = floor_material

  var sphere_material = Materials.uniform( [ "ambient": Colors.blue() * 0.1,
                                             "diffuse": Colors.blue() * 0.8,
                                             "specular": Colors.white() * 0.8,
                                             "specular_exponent": 10,
                                             "transparency": 0.7,
                                             "refractive_index": 2.5 ] )

  var small_sphere_material = Materials.uniform( [ "ambient": Colors.white() * 0.1,
                                                   "diffuse": Colors.white() * 0.8,
                                                   "reflectivity": 0.8 ] )


  var primitives = []
  primitives.push_back( translate(vec(0,-2,0), decorate(floor_material, xz_plane())) )
  primitives.push_back( translate(vec(0,2,0), decorate(ceiling_material, xz_plane())) )
  primitives.push_back( translate(vec(-2,0,0), decorate(left_wall_material, yz_plane())) )
  primitives.push_back( translate(vec(2,0,0), decorate(right_wall_material, yz_plane())) )
  primitives.push_back( translate(vec(0,0,-2), decorate(back_wall_material, xy_plane())) )


  var sphere_position = Animations.circular( [ "position": pos(0,0,1),
                                               "around": pos(0,0,0),
                                               "duration": seconds(5) ] )
  primitives.push_back( decorate( sphere_material, translate(sphere_position[now] - pos(0,0,0), scale(0.5, 0.5, 0.5, sphere())) ) )
  primitives.push_back( decorate( small_sphere_material, scale(0.25, 0.25, 0.25, sphere()) ) )

  var root = union(primitives)

  var lights = [ Lights.omnidirectional( pos(0,1.9,0), Colors.white() ) ]

  create_scene(camera, root, lights)
}

var raytracer   = Raytracers.v2()
var renderer    = Renderers.standard( [ "width": 500,
                                        "height": 500,
                                        "sampler": Samplers.multijittered(2),
                                        "ray_tracer": raytracer ] )

pipeline( scene_animation(scene_at, seconds(5)),
          [ Pipeline.animation(30),
            Pipeline.renderer(renderer),
            Pipeline.studio() ] )
1. Implementation
Ray tracer v1 added support for ambient lighting. This ray tracer adds another kind of lighting, namely diffuse lighting. Take some time to read up on it.
When ray tracing a scene, our goal is to be able to simulate each photon so that we know which effect it has on our final image. Ray tracer v1 only took into consideration a small fraction of these photons, namely only those due to ambient lighting. Ray tracer v2 will also take into account photons that are the product of diffuse lighting.
RayTracerV2 will be structured as follows (red indicates new additions compared to v1):

We now discuss each of the methods' responsibilities in turn.
|
Note
|
This may come across as a lot of unnecessary indirections, but we’re simply giving each method one responsibility. Future ray tracers will reap the rewards: implementing them will be a matter of overriding the appropriate method. |
1.1. Setting Things Up
|
Create two new files |
1.2. determine_color
|
|
The v1 version of determine_color simply returns compute_ambient.
v2 will add diffuse lighting to this.
|
Implement You may have to look up how to call the base class’s version of a method in C++. |
1.3. process_lights
This method’s sole responsibility is to iterate over each light and return the sum of all the returned colors.
|
Create a declaration (in
|
1.4. process_light_source
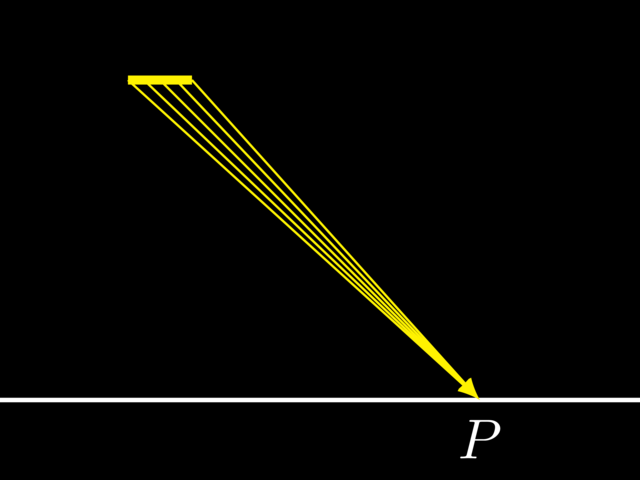
This method asks the given light source to enumerate all light rays it emits in the direction of the hit position
and passes each to process_light_ray.
For point lights, there is only one such ray, but area lights can produce many.
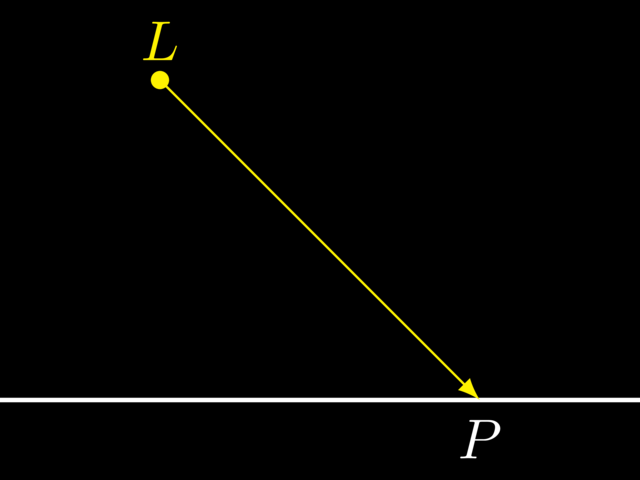
| Point Light | Area Light |
|---|---|
|
|
Note how light sources produce LightRay objects, not just Rays. A LightRay
is a Ray combined with a Color, meaning it specifies not only where the light comes from,
but also which color it is.
|
Create a declaration (in
|
1.5. process_light_ray
|
Create a declaration (in
|
1.6. compute_diffuse
Finally comes the time to actually compute diffuse lighting. The arguments provide you with all necessary data. You need:
-
The direction of the incoming light.
-
The light’s color.
-
The position to be lit.
-
The normal vector at the position to be lit.
|
Translate the mathematical formula for diffuse lighting into a protected method |
|
Tip
|
|
1.7. Finishing Touches
|
2. Evaluation
|
Reproduce the scene below. |
|
Note
|
Make sure that, while setting up the scene, you pick a low value for the ambient color, such as |