|
Disclaimer
|
This page delves into the technical details of how primitives are designed. Since the final design has some complexity to it, we will build up to it and not tell you the whole truth right away. Instead, we start off with a simple design that we will modify as we go on. |
1. The Composite Design Pattern
The Primitive hierarchy relies heavily on the
Composite design pattern.
For those unfamiliar with the concept, we will first explore a different class hierarchy
that you should already have experience with.
1.1. Examples
1.1.1. Design of GUI Libraries
How are GUIs represented using object-oriented design? Simple: by composition.
First, you get access to basic building blocks: buttons, text boxes, check boxes, labels, etc.
Next, you get a means of putting these together into larger whole.
For example, using WPF terminology, a StackPanel allows
you to put GUI controls next to each other, either horizontally or vertically.
A Grid allows you to layout controls in a grid-like fashion.
You can see these panels as "operations" on GUI controls, a bit like the "addition" of two controls
yielding a new, bigger control.
There are many such "operations" available:
-
The
Bordercontrol has the very limited task of, given a child control, to draw a border around it. -
A
ScrollViewercan be used on a large control so as to make it possible to choose which part of it should be visible on screen. -
A
ViewBoxtakes a child control and scales it.
The most important aspect of the Composite design pattern is its recursiveness.
In other words, if you apply an operation (be it a Panel, a ViewBox, a Border, or whatever) on a control, the result
is once again a control, on which you can then proceed to apply the same operations again. For example, you can have a Button,
you can apply the Border operation on it, and then again, and then once more, and you’ll have a button with three borders.
This three-bordered button can then be put inside a panel, which can be put inside a ViewBox, etc.
This recursiveness, i.e. that every operation on controls yields a new control, allows you to build
arbitrarily large GUIs.
1.1.2. Classes and Objects
Classes and objects follow the same principle. Here, the basic building blocks are the primitive types:
int, char, bool, … Classes allow you to group these together
into new types, and these new types can then be used in the construction of other types, and so on.
Imagine what would happen if this were not the case: say a class can only contain primitive types. This would be quite restrictive, making large programs much more difficult to create.
1.2. Primitives: Basic Building Blocks
So, how do we apply the same principles on primitives? Let’s first try to find out what the basic building blocks are, and then which operations can be performed on them.
The basic building blocks are geometric shapes. Games, for example, use only one such shape as building, namely the triangle. Technically, this is enough to build even the most complex of shapes: you just have to make the triangles very tiny and have enough of them. While it may seem simpler to only have to implement one shape, you have to remember that you’ll still have to find a way to produce all the right triangles, so you’re just shifting the complexity elsewhere.
In other words, it is easier to implement both Triangle and Sphere than to just
implement Triangle and build a Sphere out of it. Working with a single sphere
is also much more efficient than to have to work with thousands of tiny triangles.
So, what will our basic shapes be? Well, any shape that have a simple enough mathematical formula. Examples are:
These basic shapes are so primitive that (in our design) you cannot even change their size or position in space (except for triangles.) For example, you can only create spheres with radius 1 that are centered at \((0, 0, 0)\).
1.2.1. Transformations
This brings us to the operations we can apply on these primitives. There are actually many types of operations available, some more abstract than others. The most straightforward operations are transformations:
-
Translation
-
Scaling
-
Rotation
So, even though spheres themselves only come in size 1, you can use scaling to make them as big or as small as you want.
This approach has the advantage that it makes the implementation much simpler. It is certainly possible to
create a Sphere class whose constructor takes a center and radius parameter, but the mathematical formula
behind it will be more complex.
For example, take the cylinder primitive. For an arbitrary cylinder with radius \(R\) whose axis has direction \(\vec N\) and goes through some point \(P\), the formula is
This is quite an intimidating formula. If, however, we choose to only support vertical cylinders going through the origin, i.e., \(\vec N = (0, 1, 0)\) and \(P = (0,0,0)\) with radius \(R = 1\), this formula can be simplified considerably.
So, although this approach requires us to write more classes, they are much easier to write since they each have very limited responsibilities. Each class can also be tested separately, further simplifying our job.
1.2.2. Combining Shapes
We have discussed the basic building blocks (sphere, cylinder, cone, …) and transformations (translating, scaling, rotating). This merely allows us to create scenes consisting of a single shape, but hey, look at the bright side, it can be as big as you want.
In order to allow for scenes built out of more than one shape, we need some "grouping" operation, like panels in GUI libraries. For this, we provide Constructive Solid Geometry operations.
-
Unions allows you to have multiple primitives in the scene, i.e., the union of two spheres is… two spheres.
These operations together with transformations allow you to craft any shape you want.
1.2.3. Decorators and Materials
Another important operation on primitives is the decorator which assigns a material to a primitive. By default, a basic shape has no material assigned to it, meaning it has no color (not even black), no reflectance properties, etc. It is therefore an error to try to render an undecorated shape.
We can define any kind of materials. Examples are
1.2.4. Example
Consider the scene shown below.
It is described by the following hierarchy:
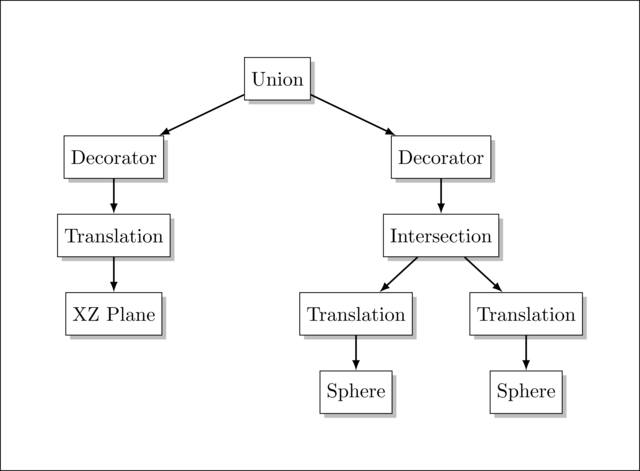
In the animation above, you can see two separate objects: a plane with a grid drawn on it and a green lens. The union at the top of the hierarchy has as sole purpose of grouping the plane and lens together. Both the plane and the lens need to be decorated; as you can see, there’s indeed a separate decorator for both. We omitted the details of the material. The plane material is responsible for the grid pattern, while the lens’s material specifies that the lens is green and refracts light.
The lens is placed above the plane. We can achieve this in multiple ways: we could lower the plane or raise the lens. We decided to move the plane downwards.
Lastly, we need to create the lens. The lens is not a basic shape, but it can be created by intersecting two spheres: we create two spheres, move one a bit to the left, the other to the right, and we only keep their intersection.
The following C++ code performs all necessary steps to create this scene. Take some time to see how it works.
raytracer::Material create_lens_material()
{
    using namespace raytracer::materials;

    MaterialProperties material_properties(colors::green() * 0.1,
                                           colors::green() * 0.1,
                                           colors::white(),
                                           10,
                                           0,
                                           0.8,
                                           1.5);

    return uniform(material_properties);
}

raytracer::Primitive create_lens()
{
    using namespace raytracer::primitives;

    auto left_sphere = translate(Vector3D(0, 0, 0.8), sphere());
    auto right_sphere = translate(Vector3D(0, 0, -0.8), sphere());
    auto lens = intersection(left_sphere, right_sphere);

    return decorate(create_lens_material(), lens);
}

raytracer::Material create_floor_material()
{
    using namespace raytracer::materials;

    MaterialProperties white(colors::white() * 0.1,
                             colors::white(),
                             colors::white(),
                             10);
    MaterialProperties black(colors::black(),
                             colors::black(),
                             colors::white(),
                             10);

    return grid(0.1, uniform(white), uniform(black));
}

raytracer::Primitive create_floor()
{
    using namespace raytracer::primitives;

    auto floor = translate(Vector3D(0, -1, 0), xz_plane());

    return decorate(create_floor_material(), floor);
}

raytracer::Primitive create_root()
{
    using namespace raytracer::primitives;

    std::vector<Primitive> primitives = { create_floor(), create_lens() };

    return make_union(primitives);
}

std::vector<raytracer::LightSource> create_light_sources()
{
    using namespace raytracer::lights;

    std::vector<LightSource> light_sources;
    light_sources.push_back(omnidirectional(Point3D(0, 5, 5), colors::white()));

    return light_sources;
}

raytracer::Camera create_camera(TimeStamp now)
{
    auto eye_animation = animation::circular(Point3D(0, 0, 2),
                                             Point3D(0, 0, 0),
                                             Vector3D::y_axis(),
                                             interval(0_degrees, 360_degrees),
                                             5_s);

    return raytracer::cameras::perspective(eye_animation(now),
                                           Point3D(0, 0, 0),
                                           Vector3D(0, 1, 0), 1, 1);
}

Animation<std::shared_ptr<Scene>> create_scene_animation()
{
    std::function<std::shared_ptr<Scene>(TimeStamp)> lambda = [](TimeStamp now) {
        auto camera = create_camera(now);
        auto root = create_root();
        auto light_sources = create_light_sources();
        auto scene = std::make_shared<Scene>(camera, root, light_sources);

        return scene;
    };

    auto function = from_lambda(lambda);

    return make_animation<std::shared_ptr<Scene>>(function, Duration::from_seconds(5));
}

void render()
{
    auto scene_animation = create_scene_animation();
    auto ray_tracer = raytracer::raytracers::v6();
    auto renderer = raytracer::renderers::standard(500,
                                                   500,
                                                   raytracer::samplers::multi_jittered(2),
                                                   ray_tracer,
                                                   tasks::schedulers::parallel(4));

    pipeline::start(create_scene_animation()) >> pipeline::animation(30)
                                              >> pipeline::renderer(renderer)
                                              >> pipeline::wif("test.wif");
}
The ray tracer is also equipped with a scripting language. Using this language is much more practical: if you were to create each scene in C, you'd have both to deal with C's complexity and long compilation times. Using the scripting language avoids all of C++'s pitfalls, plus it requires no compilation. In this scripting language, the same scene would look as follows:
def scene_at(now)
{
  var eye_position = Animations.circular( [ "position": pos(0, 0, 2),
                                            "around": pos(0, 0, 0),
                                            "duration": seconds(5) ] )

  var camera = Cameras.perspective( [ "eye": eye_position[now],
                                      "look_at": pos(0,0,0) ] )

  var white = Materials.uniform( [ "ambient": Colors.white() * 0.1,
                                   "diffuse": Colors.white(),
                                   "specular": Colors.white(),
                                   "specular_exponent": 10,
                                   "reflectivity": 0 ] )

  var black = Materials.uniform( [ "ambient": Colors.black(),
                                   "diffuse": Colors.black(),
                                   "specular": Colors.white(),
                                   "specular_exponent": 10,
                                   "reflectivity": 0 ] )

  var floor_material = Materials.grid2d( 0.1, white, black )

  var lens_material = Materials.uniform( [ "ambient": Colors.green() * 0.1,
                                           "diffuse": Colors.green() * 0.1,
                                           "specular": Colors.white(),
                                           "specular_exponent": 10,
                                           "transparency": 0.8,
                                           "refractive_index": 1.5 ] )

  var floor = decorate(floor_material, translate(vec(0,-1,0), xz_plane()))

  var lens = decorate( lens_material, intersection( translate( vec(0,0,0.8), sphere() ),
                                                    translate( vec(0,0,-0.8), sphere() ) ) )


  var root = union([ floor, lens ])

  var lights = [ Lights.omnidirectional( pos(0,5,5), Colors.white() ) ]

  create_scene(camera, root, lights)
}

var raytracer = Raytracers.v6()

var renderer = Renderers.standard( [ "width": 500,
                                     "height": 500,
                                     "sampler": Samplers.multijittered(2),
                                     "ray_tracer": raytracer ] )

pipeline( scene_animation(scene_at, seconds(5)),
          [ Pipeline.animation(30),
            Pipeline.renderer(renderer),
            Pipeline.studio() ] )
2. Classes
We now focus on how primitives are implemented. First, a warning: we will not immediately be telling you the whole truth, but instead explain in steps how the design has evolved. Hopefully, this will result in you have a better understanding of the final design.
We’ve been talking incessantly about primitives that it should come as no surprise
that there is a base class representing this concept. So, let’s start with an abstract base class Primitive.
Methods are not important for now, so there’s nothing else to say for the moment about Primitive itself.
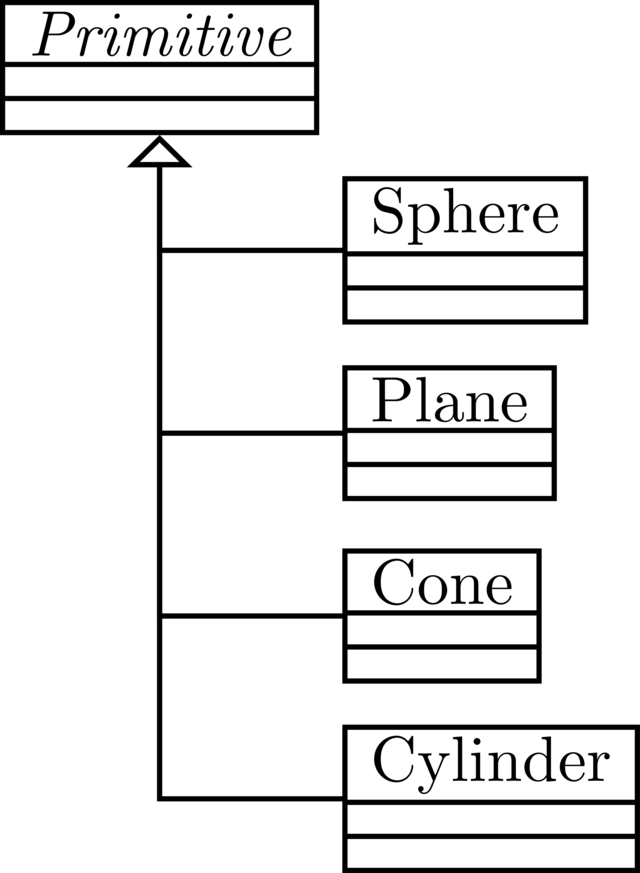
The basic shapes such as sphere, plane, cone, and cylinder are as you would expect subclasses of Primitive.
Things get more interesting with transformers. A transformer is something that takes a Primitive
and is in itself also a Primitive. Compare this to mathematical operators: the addition
takes two values, and is in itself also a value.
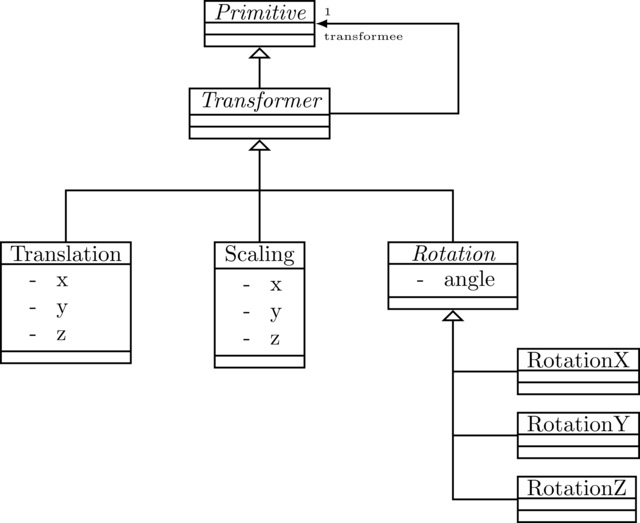
Notice the following details:
-
Each
Transformerobject keeps a link to aPrimitive. -
Each
Transformerobject is itself aPrimitive. Herein lies the power of the composite design pattern lies. -
Rotationis split up into three specialized rotations: around the X-axis, around the Y-axis and around the Z-axis.
For example, creating a 2-radius sphere centered at (1, 2, 3) requires the creation of three objects:
a Sphere, a Translation and a Scaling object. C++ code creating
these objects would look like this:
Sphere* sphere = new Sphere;
Scaling* scaling = new Scaling(2, 2, 2, sphere);
Translation* translation = new Translation(1, 2, 3, scaling);
Because each transformer is in itself a primitive, we can keep applying multiple transformations in row. Without this recursiveness, we could not have translated the scaling.
Remember though that these classes belong to the primitives module, so the classes are private to that module.
The only functionality the module exposes is the ability to create objects of these classes:
// Primitives namespace
namespace raytracer
{
  namespace primitives
  {
    Primitive* sphere();
    Primitive* translate(const Vector3D& v, Primitive* transformee);
    Primitive* scale(double x, double y, double z, Primitive* transformee);
    Primitive* rotate_around_x(Angle angle, Primitive* transformee);
    Primitive* rotate_around_y(Angle angle, Primitive* transformee);
    Primitive* rotate_around_z(Angle angle, Primitive* transformee);
  }
}

// Building a 2-radius sphere centered at (1, 2, 3)
using namespace raytracer::primitives;

Primitive* primitive = translate(Vector3D(1, 2, 3), scale(2, 2, 2, sphere()));
Now, we’ve always told you that working with pointers directly is generally a bad idea, on account of them
being so brittle. It’d be much better were we to use the more robust std::shared_ptr, so
the public interface of the primitives module looks like this:
// Primitives namespace
namespace raytracer
{
  namespace primitives
  {
    std::shared_ptr<Primitive> sphere();
    std::shared_ptr<Primitive> translate(const Vector3D& v, std::shared_ptr<Primitive> transformee);
    std::shared_ptr<Primitive> scale(double x, double y, double z, std::shared_ptr<Primitive> transformee);
    std::shared_ptr<Primitive> rotate_around_x(Angle angle, std::shared_ptr<Primitive> transformee);
    std::shared_ptr<Primitive> rotate_around_y(Angle angle, std::shared_ptr<Primitive> transformee);
    std::shared_ptr<Primitive> rotate_around_z(Angle angle, std::shared_ptr<Primitive> transformee);
  }
}

// Building a 2-radius sphere centered at (1, 2, 3)
using namespace raytracer::primitives;

std::shared_ptr<Primitive> primitive = translate(1, 2, 3, scale(Vector3D(2, 2, 2), sphere()));
While this is technically a better solution, it is also excessively verbose.
Luckily, C++ allows for type aliases. Let’s introduce an alias for std::shared_ptr<Primitive>:
// Primitives namespace
namespace raytracer
{
  namespace primitives
  {
    // PPrimitive is an alias for std::shared_ptr<Primitive>
    using PPrimitive = std::shared_ptr<Primitive>;

    PPrimitive sphere();
    PPrimitive translate(const Vector3D& v, PPrimitive transformee);
    PPrimitive scale(double x, double y, double z, PPrimitive transformee);
    PPrimitive rotate_around_x(Angle angle, PPrimitive transformee);
    PPrimitive rotate_around_y(Angle angle, PPrimitive transformee);
    PPrimitive rotate_around_z(Angle angle, PPrimitive transformee);
  }
}

// Building a 2-radius sphere centered at (1, 2, 3)
using namespace raytracer::primitives;

PPrimitive primitive = translate(Vector3D(1, 2, 3), scale(2, 2, 2, sphere()));
Now, this is rather silly. Primitive is meant to be hidden, while PPrimitive is exposed.
Why give the clumsy name to the type that we’ll actually have to use?
It would make more sense to give the private type an "ugly" name and the public type a user-friendly one:
// Primitives namespace
namespace raytracer
{
  namespace primitives
  {
    // PPrimitive is an alias for std::shared_ptr<PrimitiveImplementation>
    using Primitive = std::shared_ptr<PrimitiveImplementation>;

    Primitive sphere();
    Primitive translate(const Vector3D& v, Primitive transformee);
    Primitive scale(double x, double y, double z, Primitive transformee);
    Primitive rotate_around_x(Angle angle, Primitive transformee);
    Primitive rotate_around_y(Angle angle, Primitive transformee);
    Primitive rotate_around_z(Angle angle, Primitive transformee);
  }
}

// Building a 2-radius sphere centered at (1, 2, 3)
using namespace raytracer::primitives;

Primitive primitive = translate(Vector3D(1, 2, 3), scale(2, 2, 2, sphere()));
Now, Primitive is the public type, while PrimitiveImplementation is the private one.
This is the naming used in the RayTracer’s design. There is one small difference though: instead
of Primitive being an alias for std::shared_ptr<PrimitiveImplementation>,
it is a small wrapper class, but this makes almost no difference.
2.1. The Truth About Transformers
We warned you we wouldn’t be completely honest with you, but now it’s time for the truth. In the actual RayTracer’s design, there is no transformer class hierarchy, but just one transformer class which supports all transformations. This seemingly violates the single responsibility principle, but rest assured, it does not.
What happened is that we traded in inheritance for composition. Compare it to creating a Person class,
where each Person has an age. While it is certainly possible to have a Person base class
with subclasses PersonAged1, PersonAged2, PersonAged3, etc. you would
probably prefer to just use a single Person class with a member variable age.
The same principle applies to transformers, but instead of having an age, transformers have transformation matrices. For reasons that will become apparent later, a transformer needs to be able to transform both ways. For example, a transformer that doubles primitives in size also needs to know how to halve them back to their original size. So, the transformer needs both a transformation matrix and its inverse. We group these two together in a separate class called a transformation.
This all may seem quite confusing, so let’s give a quick overview of the different concepts:
-
A transformation matrix is a matrix representing a transformation. Internally, it is nothing but a bunch of numbers. Transformation matrices are accessible through
math/transformation-matrices.h. -
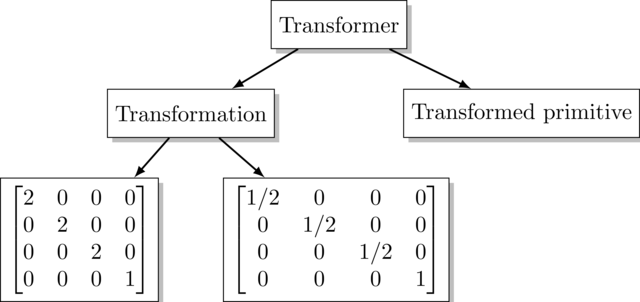
A transformation groups two transformation matrices together, one representing the "forward" transformation, the other the inverse. For example, a scaling transformation groups together these matrices:
\[M = \begin{bmatrix} 2 & 0 & 0 & 0 \\ 0 & 2 & 0 & 0 \\ 0 & 0 & 2 & 0 \\ 0 & 0 & 0 & 1 \\ \end{bmatrix} \qquad M^{-1} = \begin{bmatrix} 1/2 & 0 & 0 & 0 \\ 0 & 1/2 & 0 & 0 \\ 0 & 0 & 1/2 & 0 \\ 0 & 0 & 0 & 1 \\ \end{bmatrix}\]Transformations are declared in
math/transformation3d.h. -
A transformer takes a transformation and a primitive and applies the former on the latter.ex You can find its declaration in
primitives/transformer-primitive.
3. Functionality
We’ve discussed what the primitive class hierarchy looks like, but we ignored what member functions were
necessary. In other words, given that PrimitiveImplementation is the base class of all
primitives, what are its member functions?
You’ll be happy to learn that for each primitive, you only need to implement a grand total of two member functions:
-
std::vector<std::shared_ptr<Hit>> find_all_hits(const Ray& ray) constcomputes where the ray hits the primitive. -
Box bounding_box() constreturns a 3D box that should be barely large enough to contain the whole primitive.
A third member function, find_first_positive_hit, can optionally be overridden for optimization purposes.
If you do not override it, it will fall back on its default implementation, i.e. calling find_all_hits
and returning the first positive hit. It should be obvious that writing a separate algorithm
that specializes in only finding the first positive hit should work much faster than one that computes all hits.
3.1. find_all_hits
Finding all hits between a ray and a primitive is the hardest part of writing the RayTracer, as it involves a bit of math. Fortunately for you, you will not have to derive the necessary formulae; we will just give them to you. It will be up to you to translate a mathematical expression into C++ code.
3.1.1. find_all_hits for spheres
As mentioned above, find_all_hits's job is to determine where a ray hits the primitive.
Let’s consider the case of a sphere:
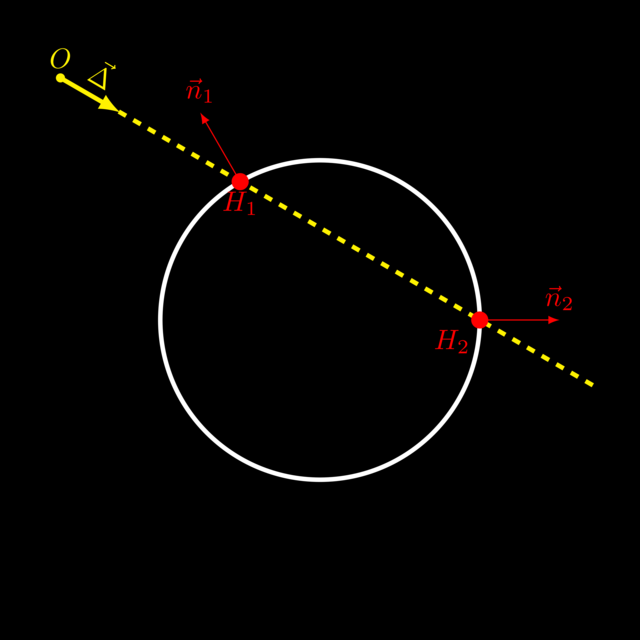
The ray (yellow) hits the sphere in two locations \(H_1\) and \(H_2\). For each hit, the following information has to be computed:
-
The \(t\)-value indicating where on the ray the intersection is positioned. If \(t < 0\), the hit is located in front of the ray’s origin, which is generally the intersection we are interested in.
-
The local position: where on the sphere the hit is located, expressed in the sphere’s own coordinate system.
-
The (global) position: where the hit is located, expressed in the world’s coordinate system.
-
The normal vector: a vector of length 1 that is perpendicular on the sphere at the hit position.
-
The material: what material the primitive is made of at that point.
-
The group id: this allows you to specify which primitives form a whole. This is important for edge detection.
The difference between the local and the global position only becomes apparent when primitives are moved around. Say, for example, that the ray goes through the top of the sphere. The sphere itself is centered at \((0,0,0)\). Both the local and global position are then equal to \((0,1,0)\). If we were to move the sphere to \((5,1,2)\), the local position would still be \((0,1,0)\), but the global position would become \((5,2,2)\). In other words, the local hit position is not affected by transformations, but the global position is.
All these pieces of information correspond to member variables of the RayTracer’s Hit structure.
A primitive does not have to update each field, but only those that apply to the primitive in question.
A sphere primitive will have to fill out the t-value, the local and global position, and the normal.
The material and group id are ignored: these are the responsibility of other primitives (namely
the decorator and group primitive, respectively.)
3.1.2. find_all_hits for decorators
Let’s now consider the decorator primitive. A decorator object has two member variables:
-
The child primitive: the primitive being decorated.
-
The material: the "paint" used to decorate the child primitive.
So, how does find_all_hits work in the case of decorators? It’s very simple:
since a primitive and a decorated primitive have exactly the same shape,
the hits will also be the same. This means that a decorator object can simply
ask its child primitives for its hit list. Go take a look at the code to see how this happens.
Once the decorator gets hold of the hit list returned by the child primitive,
it has to update the Hit objects somehow, otherwise the decorator wouldn’t be much use.
For every hit in the list, it updates the material member variable, thereby
assigning a material to the hit.
3.1.3. find_all_hits for transformers
A transformer primitive has two components: a transformation (which in turn keeps 2 matrices) and a primitive. What does a transformer need to do when asked for its hit list?
To better understand what happens, let’s again venture into a completely different situation. Say you want to make a monster movie about a 100m tall monster, but you only have the budget to buy a small 10cm stuffed animal. How do you make it look big and terrifying? The answer is simple: you place the camera very low to the ground and make it look up towards your stuffed animal.
In our RayTracer, the same problem arises: we only support small spheres, yet we need to make it look big. Instead of growing the sphere, we choose to shrink the camera. Earlier we mentioned the transformer also needed the inverse transformation: this is the reason why. If we want to enlarge a primitive 20 times, we need to be able to miniaturize the camera 20 times.
Say a transformer is initialized with matrices \(M\) and \(M^{-1}\). When asked to give a list of hits, it proceeds as follows:
-
It performs the inverse transformation on the ray, using \(M^{-1}\).
-
It asks the child primitive for all hits with this transformed ray.
-
It transforms each hit using \(M\).
Let’s apply this on an example:
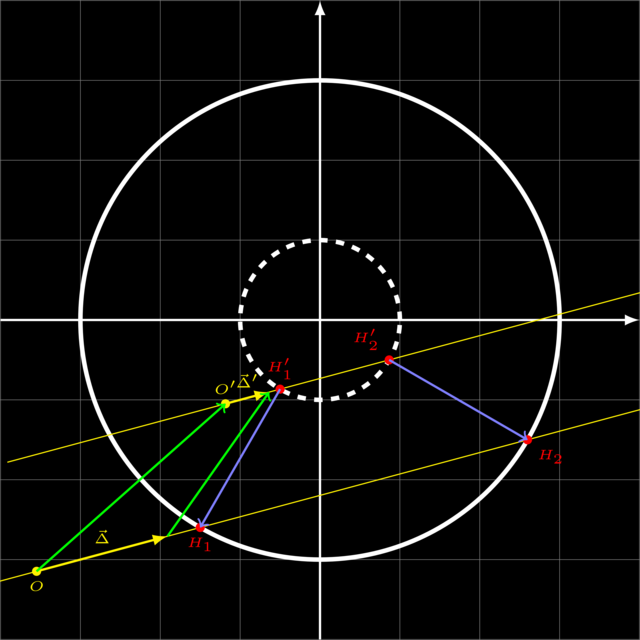
We have a sphere with radius 3 (solid white circle), which is actually a regular sphere of radius 1 (dashed white circle) scaled by a factor 3. We want to find the intersections of the ray \(O + \vec\Delta t\) with this big sphere (lower yellow line).
-
We shrink the ray by a factor 3. This gives the ray \(O' + \vec\Delta' t\) (upper yellow line).
-
We ask the small sphere for its intersections. It returns \(H'_1\) and \(H'_2\).
-
We "enlarge" these hits, giving \(H_1\) and \(H_2\), which are returned by the transformer’s
find_all_hitsmember function.
3.2. bounding_box
Compared to find_all_hits, bounding_box is quite easy.
The only thing it must do is return a bounding box, i.e. a box
that encompasses the entire primitive:
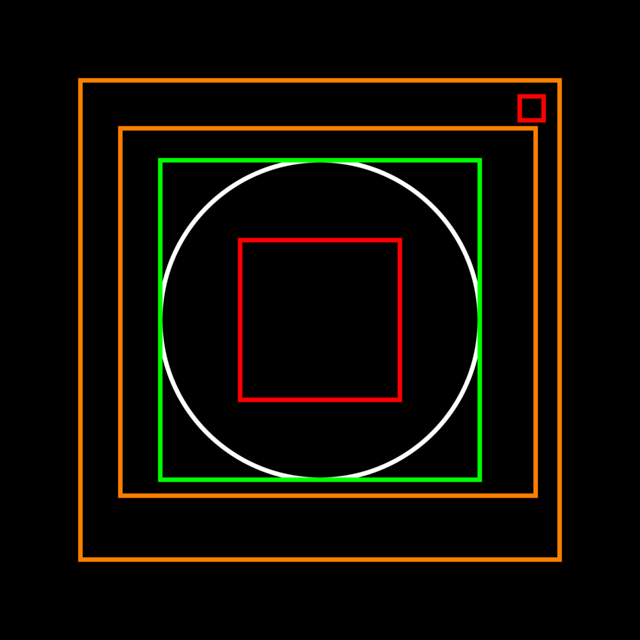
The box should be as small as possible, yet still completely contain the primitive. The best box is colored green. The orange ones are acceptable, the red ones are plain wrong.
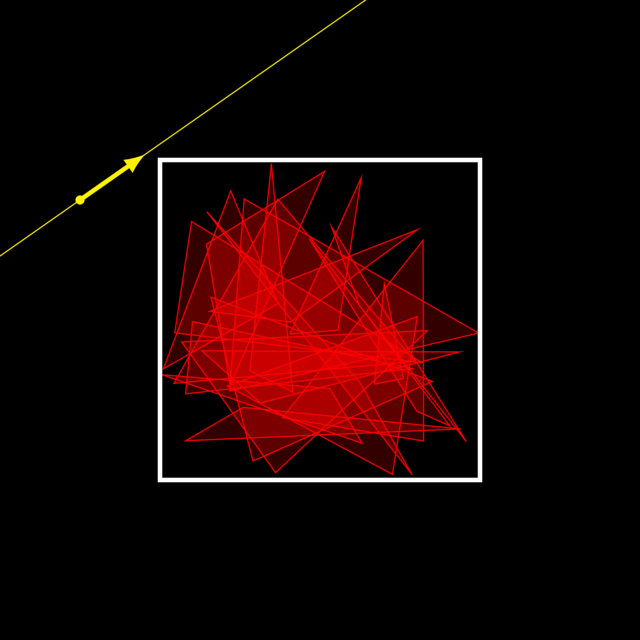
A bounding box is used to speed up the rendering process. Say you have a very complex shape S which is built from millions of triangles, meaning that finding intersections with it is computationally expensive: you have to look for intersection with each triangle in turn. Let’s also assume this complex shape S will only cover a small part of the final result, meaning that most rays will miss S.
We can make use of bounding boxes as follows to speed up the process: we build a box around
all millions of triangles. The find_all_hits function will, instead
of immediately collecting all hits with all triangles, first perform a quick check:
does the ray hit the box? If it does not, we can safely say that it won’t hit any of the triangles.
We’ve just avoided having to perform millions of computations.
3.2.1. bounding_box on spheres
Let’s take a look at how the bounding_box function might be implemented for different primitives.
For spheres, it’s quite simple: we know the sphere has radius 1, so we build a box around it with corners
\((-1,-1,-1)\) and \((1,1,1)\).
3.2.2. bounding_box on decorators
A decorator does not change anything about its child’s shape, so it can directly reuse its child bounding box without modifications. Do remember that a bounding box is invisible, so material does not matter.
3.2.3. bounding_box on transformers
There is a bit of hidden complexity here. At first glance, you might think implementing
bounding_box on transformers is simple: just transform the bounding box.
There are, however, two issues.
Bounding boxes need to be very efficient: we want to be able to tell whether a ray hits a box very quickly. This is why we chose to make bounding boxes axis-aligned, meaning each side of the box needs to be parallel to either one of the X, Y or Z axis. If we allow any kind of box orientation, the is-there-a-hit algorithm would be much slower.
Translating an axis-aligned bounding box yields another axis-aligned bounding box, so no problems there. The same is true for scaling. Rotation, however, is another matter:
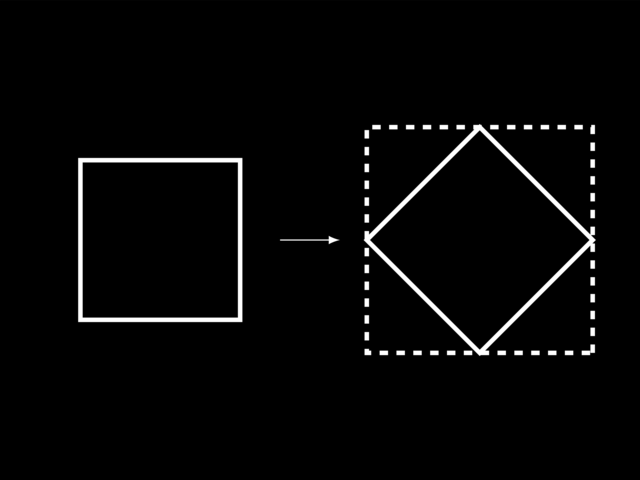
The tilted box is not axis aligned anymore, so we need to build a new bounding box around it (dashed). While this is not difficult, it does require a fair amount of calculations.
The second issue arises with infinite bounding boxes. Planes, cylinders and cones are infinitely large, so their bounding boxes must be too. Computations involving infinite values, however, tend to go awry. This can be solved as follows:
-
First check whether the bounding box is infinite, and if so, turn to a specialized algorithm. The safest way is to return a box with corners \((-\infty, -\infty, -\infty)\) and \((\infty, \infty, \infty)\). Technically, this box is always correct, but will slow down the rendering.
-
Make the infinite primitive finite, for example using a cropper.